
The JuiceBox Content Management System allows our clients to have a full control of the website content with the user-friendly editor and easily adjustable navigation menus. As a website owner, you can simply log in into the system, select the page through the navigation menu, and make your edits as desired!
Simply click in the “Source” button at the top of the editor box to view the source code. Click on the same button again to return to the visual editor.
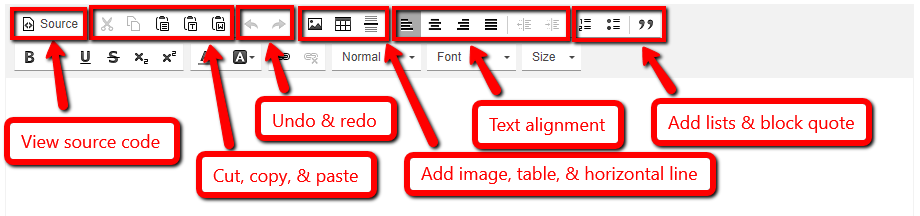
Use this the same way you would use them in a regular Word document.
In case you are pasting the text from a Word document, it is best to use the “Paste from Word” button to keep the formatting.
 Adding Images to the Page
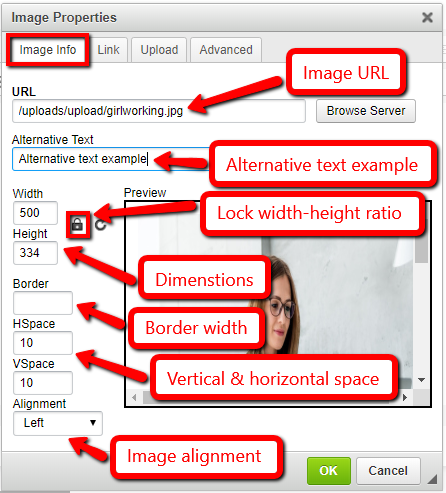
 By clicking on the “Image” icon at the top of the editor, you are able to either select an image from the ones already uploaded to the server or upload a brand new one. Click on the “Browse Server” button in the “Image Info” tab to select an existing image. Navigate to the “Upload” tab and click on the “Choose file” button and then “Send it to the Server” button to upload a new one.
Please note: Optimal image size should not exceed 1000 pixels in width and 1000 pixels in height. The image weight should not exceed 2Mb, but for optimal performance it should be under 1Mb.
In the “Image Info” tab, you can specify the image width, height, and vertical and horizontal spacing (VSpace and HSpace boxes, respectively), - simply enter the desired size in pixels. Select the “Lock” icon to the right of the image size boxes to lock the image width to height ratio.
Enter the image alternative text in the “Alternative Text” box. Use the “Alignment” drop down to either align your image to the right or to the left.
For additional styling, navigate to the “Advanced” tab , and enter the CSS code in the “Style” box.
JuiceBox editor also provides a simple way to turn any image into a link: select the “Link” tab and enter the desired URL. By using the “Target” drop down, you can specify whether the link should open in the same tab, new window, or a pop-up.
Click on the “Table” button at the top of the editor. Enter the desired number of rows and columns, as well as width and height in pixels.
Under the “Headers” drop down menu, you can assign your table to either have no header, or first row, first column, or both. Under the “Alignment” drop down, select whether you wish your table to be centered or aligned to the right or left.
In addition, you can specify the size of the table border, as well as cell spacing and padding (in pixels).
Finally, you can enter the caption and the summary in the corresponding boxes.
You can insert a horizontal separator line by simply clicking on “Insert Horizontal Line” at the top of the editor.
“Align Left”, “Center”, “Align Right”, and “Justify” buttons at the top of the editor allow you to align the text as desired. You also can decrease or increase indent with the corresponding buttons.
Whenever you wish to insert a numbered or a bulleted list, it is important to format it properly.
Enter the list of items in the main “Content” box of the editor. Then highlight the list and click on either “Numbered List” or “Bulleted List” button at the top of the editor.
In order to turn a paragraph on your page into a block quote, place the cursor in the corresponding paragraph, and then click on the “Block Quote” button at the top.
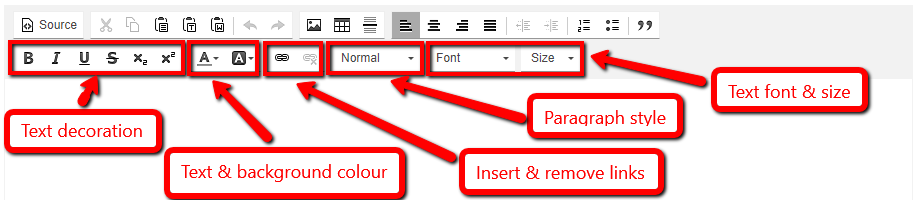
JuiceBox CMS allow you to decorate your text with the following functions: bold, italic, underline, or strike-through. Simply highlight the text in the “Content” box and click on the corresponding button at the top. Similarly, you can turn the text into a subscript or a superscript.
Highlight the text, and select the colour from “Text Colour” and “Background Colour” drop downs to customize the text even further.
.png) Adding Links
Adding LinksIn order to add a link to your page, highlight the text you wish to turn into an anchor and click on the “Link” button at the top. Under the “Link Info” tub, you can select the link type (“URL”, “Link to anchor in the text”, or “Email”) and the link protocol. For a regular link, simply keep these drop downs at default options.
Enter the URL you desire to link to in the “URL” text box. In case you are linking to the page within your own website, do not enter the entire page address. Instead, only enter the address that goes after your website domain (for example, /contacts or /about).
Navigate to the “Target” tab and use the dropdown to specify whether the link should be opened in the same tab, new window, a pop-up window, etc.
With JuiceBox, you can easily format and style your headers and regular paragraphs to match the overall website design. Place the cursor in the paragraph you wish to format, and then use the drop-down at the top of the editor. Select “Normal” for a regular paragraph. Choose “Heading 1” for the main heading of the page, and choose “Heading 2”, “Heading 3”, etc. for smaller subheadings.
Use the “Font” and “Size” drop downs at the top of the editors in toder to change the size or the font of the text.
.
All of the orders made through your e-commerce website can be easily managed with the JuiceBox CMS. Find out how to sort the order list, change the order status, and more.
Learn how to manage product categories, update product info & keep track of product inventory with JuiceBox CMS.
Learn how to view & manage the list of your business subscriber names & email addresses - with JuiceBox, it's easier than ever!
Be creative with sliders & banners on your website! Learn how to add slides, change background images, and customize the slide text.
Fill Out The Form
To Contact Us Now
Please, enter a valid value